Step-by-Step Guide to Printing a Photo on a T-Shirt with an Iron
Printing a photo on a t-shirt with an iron may seem like a daunting task. However, it's actually quite simple, and can be done in a few simple steps.
Step 1: Preparing the Photo
The first step is to prepare the photo you'd like to print on the t-shirt. If you have a digital photo, it's best to use a photo-editing program to adjust the color, contrast, and size of the photo. You'll also want to make sure the photo is printed on a glossy photo paper.
Step 2: Placing the Photo on the T-shirt
Once the photo is printed, you'll need to place it on the t-shirt. Make sure the photo is centered and positioned correctly. You may need to use some tape to secure it in place.
Step 3: Ironing the Photo
The next step is to iron the photo onto the t-shirt. Start by setting the iron on a low to medium heat setting and place it over the photo. Make sure to press and hold the iron in place for several seconds to allow the heat to penetrate through the paper and into the fabric.
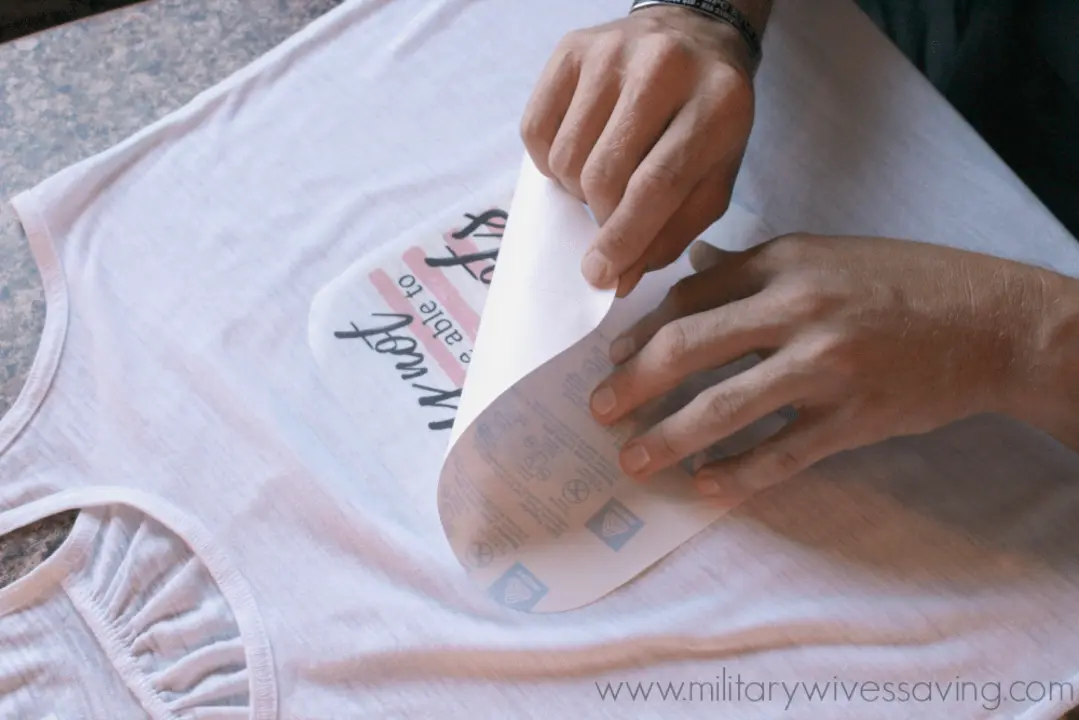
Step 4: Removing the Paper
Once the ironing is complete, you'll need to remove the paper from the t-shirt. Start by peeling the edges of the paper, then slowly remove the paper while holding the t-shirt in place. Be careful not to disturb the image, as it may be difficult to reposition the image once the paper has been removed.
Step 5: Finishing the Project
The last step is to finish the project. This can be done by ironing the t-shirt on the reverse side to secure the image. You may also want to add some fabric paint or glitter to enhance the design. Once the project is complete, let the t-shirt cool and you're done!
5 Tips for Achieving the Best Results When Printing a Photo on a T-Shirt with an Iron
Creating a unique t-shirt with a personal photo is a simple and fun way to add a touch of your personality to your wardrobe. Printing a photo on a t-shirt with an iron is a popular and easy method, but it can be tricky to get the best results. Here are 5 tips to help you get the best outcome when printing a photo on a t-shirt with an iron:
1. Pre-treat the Fabric
Before you start printing, it's important to pre-treat the fabric. This will help the image to stick to the t-shirt and prevent the image from fading over time. Pre-treat the fabric by applying a fabric adhesive to the area where you wish to place the image. This step is essential for achieving the best results.
2. Use High-Quality Images
The quality of the image will have a huge impact on the outcome of your t-shirt. Make sure to choose a high-quality image with sharp details and vibrant colors. The image should also be large enough to fit the area where you wish to place it. Avoid using small or low-resolution images, as they will not produce the best results.
3. Use the Right Type of Paper
The type of paper you use when printing the image is also important. Choose a paper that is specifically designed for use with an iron. These types of paper are heat-resistant and won't burn or stick to the iron. Make sure to read the instructions on the package to ensure that you are using the correct type of paper.
4. Set the Iron to the Right Temperature
Using the correct temperature is essential for achieving the best results. The temperature should be set to medium-high heat. Test the temperature on a scrap of fabric before printing the image on the t-shirt, to make sure it is not too hot or too cold.
5. Follow the Instructions Carefully
When printing the image onto the t-shirt, it is important to follow the instructions provided with the transfer paper carefully. Make sure to read the instructions thoroughly before starting. If the instructions are not followed correctly, the image may not transfer properly or may not be of the best quality.
Creative Ideas for Printing Photos on T-Shirts with an Iron
Printing your own photos on t-shirts is a fun, creative way to express yourself. Whether it’s a family photo, a special memory, or a favorite design, you can easily print them on a t-shirt in the comfort of your own home. All you need is an iron and some creativity. Here are some creative ideas for printing photos on t-shirts with an iron.
Choose a Quality Image
Before you begin, make sure you have a quality image that you want to use. A low-resolution image won’t print well on a t-shirt. If you’re using a digital image, the best resolution is 300 dpi (dots per inch). If you’re scanning an image, make sure it’s at least 600 dpi. Also, make sure the image is big enough—at least 4” x 4”—so that it will print clearly on the t-shirt.
Choose a Transfer Paper
You’ll need a transfer paper to print the photo onto the t-shirt. There are several types of transfer papers available, so make sure you choose the one that’s right for your project. For example, if you’re printing on a light-colored t-shirt, you’ll need a light-colored transfer paper. If you’re printing on a dark-colored t-shirt, you’ll need a dark-colored transfer paper.
Print the Image
Once you have the image and the transfer paper, you’re ready to print. Make sure you set your printer to the highest quality setting. Then, follow the instructions on the package of the transfer paper. You may need to reverse the image before printing. Once the image is printed, carefully cut out the image and place it on the t-shirt.
Iron the Image onto the T-Shirt
Now it’s time to iron the image onto the t-shirt. Make sure the t-shirt is clean and dry. Place the image on the t-shirt, then cover it with a piece of parchment paper. Set your iron to the highest setting and press firmly for 30 seconds. Then, turn the t-shirt over and press the other side for 30 seconds. Finally, let the t-shirt cool down before removing the parchment paper.
Wash and Wear
Once the image is printed, you’re ready to wear your new t-shirt! To make sure the image stays on the t-shirt, you should always wash the t-shirt inside out in cold water. Avoid fabric softener, as it can cause the image to fade. Once it’s dry, you can show off your creative t-shirt to the world!
What Types of Photos Work Best for Printing on a T-Shirt with an Iron?
When it comes to printing photos on a t-shirt with an iron, not all photos are created equal. To get the best results, it’s important to choose the right types of photos.
A good rule of thumb is to choose photos that have a high resolution and look sharp. Images with a lot of detail are ideal, as they’ll look the best when printed. If you’re planning to print a photo from a digital image, make sure it’s a high-resolution photo.
When it comes to color, the more vibrant the better. Bright colors like red, yellow, and blue will look the best on a t-shirt. Avoid using photos that are too dark, as they won’t show up on the fabric. If you’re using a black and white image, make sure it’s dark enough to be visible.
The size of the photo also matters. If you’re printing a smaller image, make sure it’s clear and sharp. Smaller images can be more difficult to print, so it’s important to choose one that’s of good quality. If you’re printing a larger image, make sure it’s not pixelated or blurry.
Finally, consider the type of fabric you’ll be printing on. Darker colors like navy blue and black will show off the image better than lighter colors. The type of fabric also affects the durability of the image, so choose one that’s thick enough to withstand the heat of the iron.
How to Care for a T-Shirt with an Iron-Printed Photo: 5 Essential Tips
Creating a unique, custom t-shirt design with an iron-printed photo is an excellent way to express yourself and make a bold fashion statement. However, it is important to know how to care for your t-shirt with an iron-printed photo in order to keep it looking great. Here are five essential tips for caring for your t-shirt with an iron-printed photo.
1. Wash Gently
T-shirts with iron-printed photos should be washed with care. Hand-washing is the best choice, as it will avoid harsh agitation, which could damage the photo. If you decide to machine wash, use the gentle cycle and a mild detergent. Additionally, it is best to avoid fabric softeners, as they can damage the photo.
2. Use Cold Water
Cold water is best for washing shirts with iron-printed photos. Hot water can cause the photo to fade or transfer to other clothing. If you use a washing machine, make sure it is set to the cold water setting.
3. Avoid High Heat
High heat can cause the photo to fade or crack. When drying, use a low-heat setting on your dryer. It is also best to avoid using an iron directly on the photo. If you need to de-wrinkle the shirt, use a low-heat setting and place a piece of cloth between the iron and the photo.
4. Remove Stains Immediately
Stains can be difficult to remove from t-shirts with iron-printed photos. To prevent staining, it is best to use a stain remover as soon as the stain appears. Do not use bleach or any other harsh chemicals on the shirt.
5. Store Properly
Proper storage is important to keep your t-shirt with an iron-printed photo looking great. To avoid fading, keep the shirt out of direct sunlight when not in use. Additionally, store the shirt away from heat sources, such as radiators, to avoid cracking. Finally, it is best to store the shirt in a dry place, such as a drawer or closet.
Following these five tips will help you keep your t-shirt with an iron-printed photo looking great for years to come. With proper care, your t-shirt will be a unique and eye-catching fashion statement for years to come. So, don't be afraid to show off your creativity and express yourself with an iron-printed photo t-shirt.